Today i want to share about how to install adb on your computer. What do you know about ADB? it is usually known Android Debug Bridge. The Advantage of using adb is we can control and interact with our Android device via our pc / latpop, such as installing applications, removing applications, see Log and many other things that we can not do if we only directly acces to our android smartphone.
but before you start to practice this tutorial please read this tutorial carefully. please be careful in typing the ADB command. Because the order is to be entered directly into the core operating system android. and we are not responsible if you are not careful in doing so.
ADB or the Android Debug Bridge is a tool created by developers to facilitate managing Android device or Android Emulator. ADB is a tool client - server which is run on your computer and then after the ADB is running, you can connect to the client (may Android device here or Android Emulator) to then perform many commands. Sorry if my understanding of the position of client-server is still a bit confused,
you can read more in developper.android.com
Ok then we go to the first step for how to use adb android, we need to install software development kit andrpid on pc/laptop
How To Install SDK Android on Computer
- First download the Android SDK from the following link. i recommend you to choose installer_r11-windows.exe (Recommended)
http://developer.android.com/sdk/index.html - Chooe that match with your Operating System, and then install as you install other applications on both Windows, Linux or OS X.
- Once installed you'll get a folder named android-sdk-xxxxx where xxxxx is the name of your operating system.
- Now in order that you do not have to call the full path every time we want to use the ADB. we input the path in where that ADB exist to system environment if you use WINDOWS or export PATH if you use linux.
- in Windows 7 you click Computer -> Properties -> select Advanced System Settings -> Click on Environment Variables -> Select PATH -> and click Edit


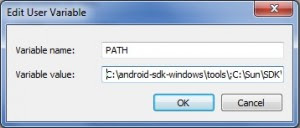
- Then you add the path to android sdk. on my laptop its location is in C: \ android-sdk-windows \ tools and remember every path is limited by; (a semicolon) so if the path was the beginning of the section inserted by you, is C: \ android-sdk-windows \ tools;
- Close by clicking OK button, and so on.
- To run the ADB in Windows you can click on start -> run - and type cmd then enter.
- If not run the above procedure, every time you want to run the adb command you must type the full path c:\android-sdk-windows\tools\adb.exe long enough right? well now after the above procedure is done then you can type adb anywhere and the result is the same as typing the full path.
For the Linux and OS X The easiest way to enter is by using export PATH command, to use it is by typing it directly.
export PATH=$PATH:/home/Giest/android-sdk/tools
Adjust its path to android sdk location you have, but the export command will only run one time, every time restart PATH is lost and must be re-typed again.
to give Permanent order for a specific user, please edit the file. Bash_profile in your user home folder and the input path.
Ok now you've installed the Android SDK and the next is to make sure that the USB debugging is already running.
Click the Menu button -> Select Settings -> Select Applications -> Development -> and click on USB debugging.
After positioning the USB debugging on the checklist please to return to the home screen with the escape key.
Next is to connect devices to the computer.
When first installed you will be prompted to install drivers. The trick of course different. I use a Motorola Droid X and Tablet Toshiba PicoPad, the way I do simply by installing software called congenital Motorola USB Driver RSDLite and Motorola. For other brands would do differently please search on Google for its full instruction.
Even so the use of ADB's preparation phase has been completed.
for most of the commands most often used, so if you are looking for a more complete command reference please visit
http://developer.android.com/guide/developing/tools/adb.html
Ok now lets start
first command just type adb and the output is
adb
Android Debug Bridge version 1.0.26
-d – directs command to the only connected USB device
returns an error if more than one USB device is present.
————
————
————
ANDROID_LOG_TAGS – When used with the logcat option, only these debug tags are printed.
deliberately capture results in pieces due to length.
it only Displayed a help file when only type adb, so if forgotten with the option of just typing adb and read again.
Next is to run the adb first time every time after restarting the computer
adb devicesThere appear just run adb daemon using port 5037, and no device is connected. This could be caused because there is no device is connected via USB or USB debugging setting has not been in the checklist.
* daemon not running. starting it now on port 5037 *
* daemon started successfully *
List of devices attached
And the following display when the USB debugging on the checklist.
adb devicesthat means the device is connected, and now you can do adb commands the other.
List of devices attached
1000c826978d device
For the record, only one device that connects multiple devices in advance for later residence which device is selected to be used.
ADB Command List
installing Applications with adb
examplesadb install apktor.apkIf we want to reinstall or upgrade the application using the-r option
1580 KB/s (79031 bytes in 0.048s)
pkg: /data/local/tmp/apktor.apk
Success
adb install -r apktor.apk
1580 KB/s (79031 bytes in 0.048s)
pkg: /data/local/tmp/apktor.apk
Success
note: we are already in the directory where apktor.apk located. if the file. apk located in a different directory then the full path should be included.
uninstall android Applications
to uninstall the application we have to know the full name of our application to be uninstalled. Uninstall by mentioning the sort name of applications often fail to do.
for example
adb uninstall apktorthe correct command is
Failure
adb uninstall com.gotoinit.apktorfor more adb list command you can go here http://developer.android.com/guide/developing/tools/adb.html
Success
Ok, see you in another tutorial tweaking android
0 komentar:
Post a Comment