Layout Animation
We'll use layout animation with the ListView and GridView, which are the two most commonly-used controls in Android. Specifically, we'll use layout animation to add visual effects to the way each item in a ListView or GridView is displayed. Actually, we can use this type of animation on all controls derived from a ViewGroup.
Layout animation works by applying tweening to each view that is part of the layout being animated. Here are four types of tweening animation:
We can define both the individual animation and the mediator in XML files in the /res/anim subdirectory. Once we have the mediator XML file, we can use that file as an input to the ListView in its own XML layout definition.
Let's start by creating XML layout for the ListView so we can load that layout in a basic activity.
Here is the file, /res/layout/list_layout.xml:
Now that we have the layout needed for the activity, we can write the code for the activity to load the layout file so we can generate our UI.
LayoutAnimation.java
/res/anim/list_layout_controller.xml
Here are the XML files for the animation set:
/res/anim/alpha.xml
/res/anim/rotation.xml
/res/anim/scale.xml
/res/anim/translate_alpha.xml

Files used in this layout animation example, LayoutAnimation.zip
We'll use layout animation with the ListView and GridView, which are the two most commonly-used controls in Android. Specifically, we'll use layout animation to add visual effects to the way each item in a ListView or GridView is displayed. Actually, we can use this type of animation on all controls derived from a ViewGroup.
Layout animation works by applying tweening to each view that is part of the layout being animated. Here are four types of tweening animation:
- Scale animation
We use this type of animation to make a view smaller or larger either on x axis or on the y axis. We can also specify the pivot point around which we want the animation to take place. - Rotate animation
We use this to rotate a view around a pivot point by a certain number of degrees. - Translate animation
We use this to move a view along the x or y axis. - Alpha animation
We use this to change the transparency of a view.
We can define both the individual animation and the mediator in XML files in the /res/anim subdirectory. Once we have the mediator XML file, we can use that file as an input to the ListView in its own XML layout definition.
Let's start by creating XML layout for the ListView so we can load that layout in a basic activity.
Here is the file, /res/layout/list_layout.xml:
<?xml version="1.0" encoding="utf-8"?>The file shows a simple LinearLayout with a single ListView in it. However, we should mention one point about the ListView definition.
<LinearLayout xmlns:android="http://schemas.android.com/apk/res/android"
android:orientation="vertical"
android:layout_width="fill_parent"
android:layout_height="fill_parent">
<ListView
android:id="@+id/list_view_id"
android:persistentDrawingCache="animation|scrolling"
android:layout_width="fill_parent"
android:layout_height="fill_parent"
android:layoutAnimation="@anim/list_layout_controller" />
</LinearLayout>
Now that we have the layout needed for the activity, we can write the code for the activity to load the layout file so we can generate our UI.
LayoutAnimation.java
package com.bogotobogo.layoutanimation;First, we loads the view based on the generated layout ID R.layout.list_layout
import android.app.Activity;
import android.os.Bundle;
import android.widget.ArrayAdapter;
import android.widget.ListView;
public class LayoutAnimation extends Activity
{
@Override
public void onCreate(Bundle savedInstanceState){
super.onCreate(savedInstanceState);
setContentView(R.layout.list_layout);
setupListView();
}
private void setupListView(){
String[] listItems = new String[] {
  "Item 1", "Item 2", "Item 3",
  "Item 4", "Item 5", "Item 6",
 };
ArrayAdapter listItemAdapter =
new ArrayAdapter(this
,android.R.layout.simple_list_item_1
,listItems);
ListView lv = (ListView)this.findViewById(R.id.list_view_id);
lv.setAdapter(listItemAdapter);
}
}
ListView lv = (ListView)this.findViewById(R.id.list_view_id);Our goal is to take the ListView from this layout and populate it with six text items. These items are loaded up into an array.
String[] listItems = new String[] {
"Item 1", "Item 2", "Item 3",
"Item 4", "Item 5", "Item 6",
};We'll need to set a data adapter into a ListView so that the ListView can show those items.lv.setAdapter(listItemAdapter);To create the necessary adapter, we'll need to specify how each item will be laid out when the list is displayed. We specify the layout by using a predefined layout in the base Android framework. This layout is specified as
android.R.layout.simple_list_item_1However, as with any other activity invocation, we'll need to register the LayoutAnimationActivity in the AndroidManifest.xml file for the preceding intent invocation to work:
<?xml version="1.0" encoding="utf-8"?>We need another XML file that acts as a mediator between itself and the animation set. Here is the mediator XML file:
<manifest xmlns:android="http://schemas.android.com/apk/res/android"
package="com.bogotobogo.layoutanimation"
android:versionCode="1"
android:versionName="1.0">
<application android:icon="@drawable/icon" android:label="@string/app_name">
<activity android:name=".LayoutAnimation"
android:label="@string/app_name">
<intent-filter>
<action android:name="android.intent.action.MAIN" />
<category android:name="android.intent.category.LAUNCHER" />
</intent-filter>
</activity>
</application>
<uses-sdk android:minSdkVersion="4" />
</manifest>
/res/anim/list_layout_controller.xml
<layoutAnimation xmlns:android="http://schemas.android.com/apk/res/android"The mediator file, in this case, is for the transparency animation as we can see it from the line:
android:delay="30%"
android:animationOrder="reverse"
android:animation="@anim/alpha" />
android:animation="@anim/alpha" />
Here are the XML files for the animation set:
/res/anim/alpha.xml
<alpha xmlns:android="http://schemas.android.com/apk/res/android"
    android:interpolator="@android:anim/accelerate_interpolator"
    android:fromAlpha="0.0" android:toAlpha="1.0"  android:duration="5000" />
/res/anim/rotation.xml
<rotate xmlns:android="http://schemas.android.com/apk/res/android"
    android:interpolator="@android:anim/accelerate_interpolator"
    android:fromDegrees="0.0"
    android:toDegrees="360"
    android:pivotX="50%"
    android:pivotY="50%"
    android:duration="500" />
/res/anim/scale.xml
<set xmlns:android="http://schemas.android.com/apk/res/android"
      android:interpolator="@android:anim/accelerate_interpolator">
   <scale
      android:fromXScale="1"
      android:toXScale="1"
      android:fromYScale="0.1"
      android:toYScale="1.0"
      android:duration="500"
      android:pivotX="50%"
      android:pivotY="50%"
      android:startOffset="100" />
</set>
/res/anim/translate_alpha.xml
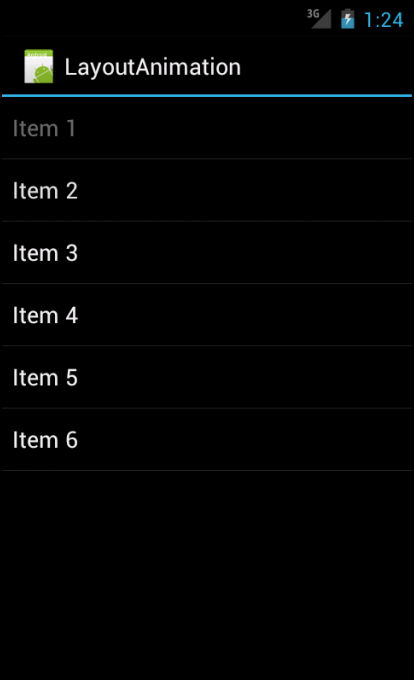
<set xmlns:android="http://schemas.android.com/apk/res/android"Here is a snapshot during the transparency animation.
android:interpolator="@android:anim/accelerate_interpolator">
<translate android:fromYDelta="-100%" android:toYDelta="0"
android:duration="500" />
<alpha android:fromAlpha="0.0" android:toAlpha="1.0"
android:duration="500" />
</set>

Files used in this layout animation example, LayoutAnimation.zip
0 komentar:
Post a Comment